Sunday, April 28, 2013

Check Disk (chkdsk) Runs Every Time Windows Starts


Sometimes it happens that disk check always starts to check the file system on one or more drives for consistency. If any key is pressed, the disk checking is aborted. Actually this is because some data structure of the drive or some file is corrupted which can not be recovered and check disk is always run at Windows startup. Or sometimes it may take several hours for disk checking to scan all the drives. So disabling it or postponing disk check is better. There are several methods to disable disk checking at Windows startup. Two of them are given below:

Method 1: Using CHKNTFS utility

CHKNTFS is a utility that has been developed by Microsoft to disable disk checking on certain drives at Windows startup. To use this utility go to Start –> Run –> cmd
If you want to disable check disk on C: drive, use the following command on command prompt.
chkntfs /X C:

If you want to disable check disk on two or more drives, just keep on adding the drives:
chkntfs /X C: D: E:
This will disable check disk on C, D and E drives.
If you want to restore what you have done, that is, enable automatic disk checking on all the drives again, just run the following command:
chkntfs /D
This will restore all the drives to automatic disk checkup.

Method 2: Using Registry

To disable automatic disk checking at Windows startup through registry, go to the following registry key:
HKEY_LOCAL_MACHINESYSTEMCurrentControlSetControlSession Manager
In the right hand pane, double click BootExecute.
The default value of the key is autocheck autochk *
* means every drive is checked for consistency. Just add /K:C at the end before *. /K switch will disable autocheck on C: drive at Windows startup. So the final value should look like this:
autocheck autochk /k:C *
If you want to add more drives, the key should look like this: (disabling C and D drives)
autocheck autochk /k:C /k:D *
If you want to restore everything to default, just replace the key with the default one i.e.,
autocheck autochk *


Tuesday, April 23, 2013

Autodiscover redirect warning in Outlook


How to enable the hotfix

Important This section, method, or task contains steps that tell you how to modify the registry. However, serious problems might occur if you modify the registry incorrectly. Therefore, make sure that you follow these steps carefully. For added protection, back up the registry before you modify it. Then, you can restore the registry if a problem occurs. For more information about how to back up and restore the registry, click the following article number to view the article in the Microsoft Knowledge Base:
322756 How to back up and restore the registry in Windows
To enable this hotfix, follow these steps:
  1. Close Outlook 2007.
  2. Start Registry Editor.
    • In Windows Vista, click Start
      Start button
      , type regedit in the Start Search box, and then press ENTER.

      User Account Control permission
        If you are prompted for an administrator password or for confirmation, type the password, or click Continue.
    • In Windows XP, click Start, click Run, type regedit in the Open box, and then click OK.
  3. Locate and then click to select the following registry subkey:
    HKEY_CURRENT_USER\Software\Microsoft\Office\12.0\Outlook\AutoDiscover\RedirectServers
    Note You can also use the following registry subkey:
    HKEY_CURRENT_USER\Software\Policies\Microsoft\Office\12.0\Outlook\AutoDiscover\RedirectServers
  4. On the Edit menu, point to New, and then click String Value.
  5. Type the name of the HTTPS server to which AutoDiscover can be redirected without prompting for confirmation from the user, and then press ENTER. For example, to allow redirection to https://adatum.com, the first String Value (REG_SZ) name would be this:

    adatum.com

    Note There is no need to add text to the Value data box. The Data column should remain empty for the string values that you create.
  6. To add additional HTTPS servers to which AutoDiscover can be redirected without displaying a warning, repeat steps 4 and 5 for each server.
  7. On the File menu, click Exit to exit Registry Editor.
Note Before the October 26, 2010 hotfix update, Outlook 2007 used a different registry path and value:

Key: HKEY_CURRENT_USER\Software\Microsoft\Office\12.0\Outlook\AutoDiscover

or
Key: HKEY_CURRENT_USER\Software\Policies\Microsoft\Office\12.0\Outlook\AutoDiscover
Name: RedirectServers
Type: REG_SZ (string)
Data: adatum.com; contoso.com; mail.veoliawater.com.my
After installing any current hotfix update that is later than the October 26, 2010, hotfix update for Outlook 2007, this registry key and value is no longer used.


Wednesday, April 10, 2013

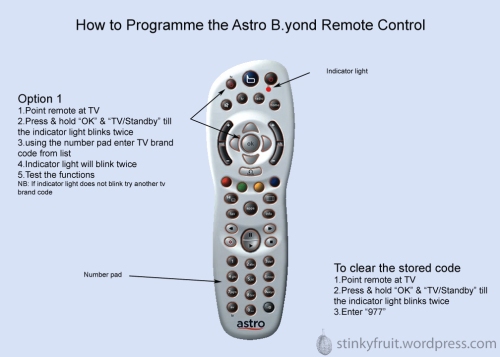
Using the Astro B.yond Remote to control your TV.


Each TV set works differently so its up to you to programme the remote to your TV.
Apart from being able to control the TV’s volume with the B.yond remote you will be able to also control the power, av input & mute of the TV.
There are 2 options for programming the remote control. For both of them make sure you are close to your TV set to ensure you get the best results.
Option 1 (using your TV code)
List of codes
Option 2 (forces the remote to scan its database of TV codes)
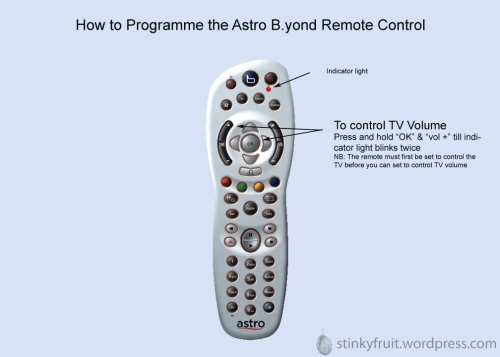
Now the astro B.yond remote is controlling your TV functions but you need to do one last programming step.
Controlling your TV’s Volume

Tuesday, April 9, 2013

Outlook Email Error


Please compare your internet setting/proxy with his/her setting and change accordingly. Or else please follow below simple method:

Step 1: From within Outlook click Tools -> Send/Receive -> Download Address Book -> Ok.

If you still receive this error message when sending or receiving please proceed to Step 2.

Step 2: Rebuild your offline files:
1. Go to C:\Documents and Settings\YourLoginName\Local Settings\Application Data\Microsoft\Outlook and create a folder called tmp.
2. Move all of the files located into this folder.
3. Start Outlook and be patient as it regenerates a copy of your mailbox
4. Once you get the message "All folders are up to date" at the bottom right, try the send and receive
If you still receive this error message when sending or receiving please proceed to Step 3.

Step 3: Create a new profile for Outlook. Once the new profile is created, log in to the mailbox and wait for it to completely synch

UniFi HyppTV Remote